
Android Development, Part 1a: From Nothing To Running
posted on 09/28/10 at 06:43:11 pm by Joel Ross
This is part 1a in an ongoing series about my experiences developing an Android app to use with Pay It Square. If you're just joining us, first, thanks! And second, here's where we've been so far:
- Part 0: Introduction
- Part 1: Project Structure and Tools
- Part 2: Presenters and Activities
- Part 3: Roboguice
- Part 4: UI Basics
I've also added an easy to remember index page at http://www.rosscode.com/android that I'll keep current as I post more parts.
Wait, what? Part 1a? Yes, I'm going backwards, but I got a few questions on how my projects are actually set up - from a tactical standpoint. So I'm going to go back and revisit project setup in more detail. More specifically, we'll go from nothing to our first test with Instinct, and then move on to getting our activity all wired up and running the application.
I'll be using Eclipse, and I'll assume we've already run through one of the many tutorials out there for getting it installed and working with the Android SDK. To start with, we'll create a new Android Project:
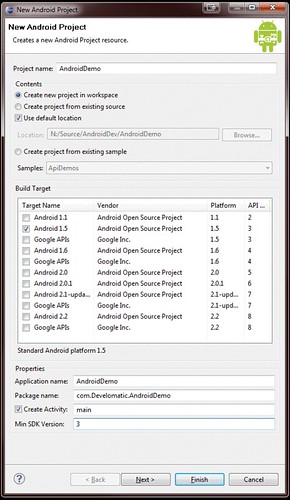
I've targeted Android 1.5 and a minimum SDK version of 3, just because I don't have any need for anything offered by the newer SDKs, and I don't really want to limit the devices the software can work on. Also note that I am not asking the project creation wizard to create a test project. I'll do that myself later.
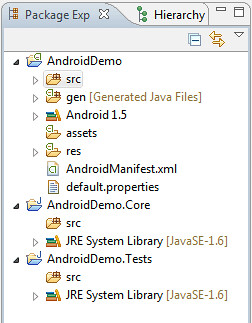
Next, we'll add two new projects: one for our core library, and one for our tests. I accept the standard settings for the projects, and named one <ProjectName>.Core and the other <ProjectName>.Tests. When all is said and done, I end up with a project that looks like this:
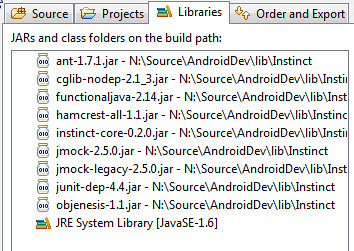
Next, we need to add our references to our libraries. To just get unit tests working, all we have to add is a reference to Instinct. I like to add a folder at the same level as my projects called lib, and put the libraries under that. Then I can add references by right clicking on the project, selecting properties, and going to Java Build Path.
When you add a reference to Instinct, you're not just adding Instinct. Remember, Instinct sits on top of jMock, so you'll need to add references to much more than just Instinct. Here's my reference list:
Now, we need to add a test. Let's assume we have an application with a database that stores a user. On our main screen, we want to show a message: "Welcome Back, <Name>". We'll test a presenter, and ensure that it sets the text on the view to the user name retrieved from the user repository.
Let's create our test class. I prefer to call my test classes specs, so I'll create a class called MainPresenterSpecs, since my activity is called "main". Here's the full code, minus import statements:
1: @RunWith(InstinctRunner.class)
2: public class MainPresenterSpecs {
3: @Subject private MainPresenter SUT;
4: @Mock private IMainActivity activity;
5: @Mock private IUserRepository userRepository;
6:
7: @BeforeSpecification
8: public void before() {
9: SUT = new MainPresenter(userRepository);
10: }
11:
12: @Specification
13: public void it_should_load_user_name_on_load_of_activity() {
14: final User user = new User();
15: user.setName("Joel Ross");
16:
17: expect.that(new Expectations() {
18: {
19: one(userRepository).get(); will(returnValue(user));
20: one(activity).setUserNameTo("Joel Ross");
21: }
22: });
23:
24: SUT.InitializeWith(activity);
25: }
26: }
If you take this code and put it in your solution, you'll notice a few things. Mainly, it won't compile. I wrote the spec for what I want to have happen when the first screen loads. But now I need to go at least create the classes and interfaces referenced here. These will all be in our Core project.
First up: User. Pretty straightforward data class:
1: public class User {
2: private String name;
3: public void setName(String value) {
4: name = value;
5: }
6: public String getName() {
7: return name;
8: }
9: }
Next, the two interfaces, IMainActivity and IUserRepository. If you're not familiar with Eclipse, now would be a good time to note that if you place your cursor over either of the interface names and press Ctrl-1, you'll get options to fix the issue with the code. In this case, one of the options will be to create an interface. You can then specify which project you want the code in. In this case, I created them in the Core project:
1: public interface IUserRepository {
2: User get();
3: }
4:
5: public interface IMainActivity {
6: void setUserNameTo(String name);
7: }
Now, we just have the presenter to implement. It's a simple implementation, so let's just implement it now:
1: public class MainPresenter {
2: private IUserRepository userRepository;
3:
4: public MainPresenter(IUserRepository userRepository) {
5: this.userRepository = userRepository;
6: }
7:
8: public void InitializeWith(IMainActivity activity) {
9: User user = userRepository.get();
10: activity.setUserNameTo(user.getName());
11: }
12: }
We're all set to run our test now, right? Well not quite. We didn't add a reference to our Core project from our tests, so let's do that now. Back under the "Java Build Path" settings, we can go to the Projects tab, and add our Core library. After doing that, our code is now error free.
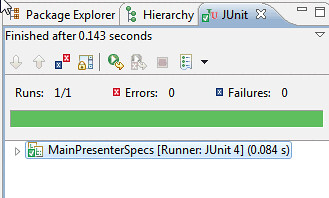
To run our tests, we can right click on the test project, select "Run As" -> JUnit Test. The first time you do this, you'll be presented with a dialog asking you how you want to run the test. Check "Use configuration specific settings" and then select "Eclipse JUnit Launcher". After doing so, click OK, and you'll be presented with the best sight a TDD developer can see:
OK, so we have a passing test. Now we need to get the activity working and have it show in our application. This involves getting Roboguice wired up, so we'll add a reference to that from our Android project. Then, as I detailed in Part 3, we need to add an Application class, a module, and a setting in our manifest file. We also need to add a reference to our Core project from our Android project. Once we do that, we can implement our activity. I added a TextView to my main layout xml file, set up the activity to be roboguice-ready, and here's what I came up with:
1: public class main extends GuiceActivity implements IMainActivity {
2: @Inject private MainPresenter presenter;
3: @InjectView(R.id.welcomeMessage) TextView welcomeMessage;
4: @Override
5: public void onCreate(Bundle savedInstanceState) {
6: super.onCreate(savedInstanceState);
7: setContentView(R.layout.main);
8: presenter.InitializeWith(this);
9: }
10:
11: public void setUserNameTo(String name){
12: welcomeMessage.setText("Welcome Back, " + name);
13: }
14: }
Now that everything is coded, all that's left is to implement IUserRepository. I just created a fake one that returns a dummy user for my purposes, and bound it in my module. Now, I'm ready to run the project. I can right click on the Android project and select "Run As" -> "Android Application". This will fire up the emulator, and after a few minutes, our application will start up, and display our message. Right?
Well, not quite. First, we need to add a reference to Roboguice to the core library, and add an @Inject annotation to the constructor in our MainPresenter. Then, when we fire up the app again, we'll see this:
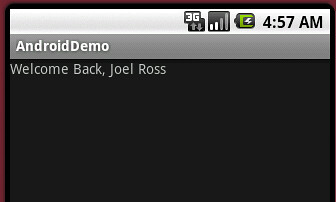
Just as we set out to do! We've gone from nothing to a running and tested application in a very short time.
For those who want to get their hands on the resulting code, I've created a git repository to hold it:
This is my first time posting and sharing code via git and GitHub, so if it doesn't work correctly, let me know. I didn't commit the .metadata folder, so you will need to import the projects into Eclipse after cloning from git. Also, Eclipse probably won't know where your Android SDK is located. Just set the location of the SDK in the Project?s Properties and you should be all set.
Next time, we'll get back on track and dive deeper into activities.
Categories: Android