
Simulating an SVN-style merge with Mercurial
posted on 06/28/12 at 07:57:35 am by Joel Ross
Up until about a month ago, we used Subversion as our source control at TrackAbout. For a variety of reasons, we've switched to Mercurial, and so far, I've been extremely happy with the switch. It's been a little bit of a learning process, but using a DVCS on a regular basis has been something I've wanted to do for a while.
Things were going smoothly until I ran into a situation where I needed to merge a change from our development branch back to the latest release branch. It sounded simple enough - I've done it in SVN. Doing it in Mercurial should be just as smooth, right?
Here's my repository as it stands right now. We created a release back at revision 1, and continued doing development and are up to revision 5.
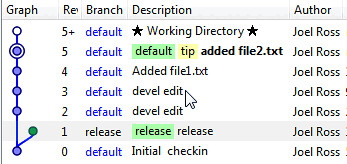
Now, I want to merge just revision 5 into the release branch. My first try (hint: it doesn't work!) was to update my repository to the release branch and run "hg merge -r 5". Running "hg st" shows the following:

Our change is in there - file2.txt is added. But file1.txt was also added, even though that was done in revision 4. Also, readme.txt is modified, which was done in revisions 2 and 3. That's not what we wanted! We said to merge revision 5, but it did revisions 2 through 5. With Mercurial, merging a revision from the default branch to the release branch basically means to make the release branch look like the default branch as of revision 5.
After some searching, I found two solutions: transplant, which is an extension that has to be enabled, and graft, which is built in to Mercurial 2.0 and above. Since graft works out of the box, we'll use that.
Running "hg graft 5" yields the following results:
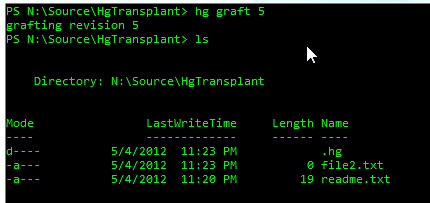
Our one file, file2.txt, has been moved over. file1.txt has not been moved over, and readme.txt does not include the changes made to the default branch. Running "thg log" shows that the one revision has been "copied" into the release branch.
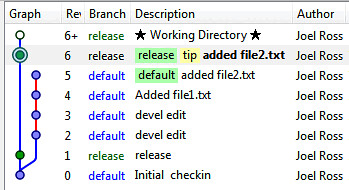
At this point, I'd be able to push my changes to the central repository with the one revision "merged" into it. One quick note about that: you need to do the push including a revision, otherwise you'll get an error about creating multiple heads. You do that by running "hg push release -r tip" since we want to push just the path that includes tip.
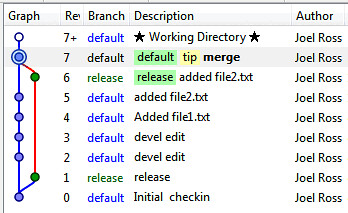
Once we're done, we need to get back to the default branch, and merge our local repository so we no longer have two heads. First, update to the default branch ("hg up default") and then merge the release branch into it ("hg merge release"). Once that's done, commit the merge ("hg ci -m 'merge'"), and our log looks like this:
I'm back to a single head, and ready to continue on my way with development. This covers working local, but in most cases, you'll have a remote repository to pull and push to, so below is an in-order list of the commands I use to move a single revision from one branch to another. This assumes we don't have any uncommitted changes (although they may not be pushed anywhere yet). It also assumes that we have two remote branches with aliases devel (for current development) and release (for the latest release).
- hg pull devel
- hg up
- hg pull release
- hg up release
- hg graft <revision>
- hg push release -r tip
- hg up devel
- hg merge release
- hg ci -m 'merge'
- hg push devel
Once done with the list above, my revisions have been moved to the release branch on the server and I'm back to being able to work against the development branch again.
Categories: Development, Software, TrackAbout, Inc
Dynamic Images and Performance Implications
posted on 05/07/12 at 11:03:14 am by Joel Ross
When we first started writing Tourneytopia, we made a lot of decisions without really thinking about the performance implications. The choices we made were fine for the time, but as we grew, we noticed slowdowns and eliminated them as they cropped up.
Well, one cropped up just recently, and I like the solution we came up with, so I thought I'd share it.
Before we get to the solution, let's talk about the problem. When a user creates a new pool, they can upload their own logo. We want to store that image in the database and display it to every user who comes to the pool. We chose to store the image in our database, so we'll need to be able to get it out of the database and into a format that we can use for the page.
Our initial solution served us well for a few years, really (or at least it wasn't so bad that there were complaints). We pulled the image out of the database and served it up through an HTTP Handler. I'll leave that code out of this post, but there are resources that show something similar to what we did. The solution isn't horrible, but what we found was we had a lot of trouble getting browsers to cache the request, even when we set the necessary HTTP headers.
There's two problems with this solution. First, it requires that we pull the image out of the database every time we need it. The second problem magnifies the first. Since the image is not being cached by the browser, we're going back to the database even more - every request for every user. Now, we probably could have solved the caching problem, but we'd still be hitting the database to get the image once per user, and if the cache expired, we'd have to go back to the database again.
So what's the solution look like? Well, we should talk about the ideal solution. From a performance standpoint, the best would be to never hit the database. When a user uploads a new image, we could just store it on the file system and we'd never have to hit the database. This isn't ideal for us because it doesn't work well in a web farm and it makes it harder to move the application to a new server. Those two problems are why we chose to store the image in the database in the first place.
So if 0 database hits are out of the question, what's the next best solution? One database hit. Which is pretty close to what we ended up with. Technically, it's one database hit per server in the farm, but that's acceptable too. If we worked out the caching issue I mentioned above, the best we could do is get to one database hit per user, and since we have more users than servers in the web farm, this is definitely better.
How did we get it down to 1 hit? When the image is requested, we write it out to the file system, store the path to the image in the database, and return the path as the URL. Subsequent requests just return the path as the URL. The result: One hit to the database no matter how many users request the image! And, since it's just an image, IIS handles setting the cache headers for us so the browser caches it just as it would with any other image.
What does the code look like?
1: public string GetLogoPathFor(Pool pool)
2: {
3: if (pool.LogoPath.HasValue()) return pool.LogoPath;
4:
5: var image = pool.GetPoolImage();
6:
7: if (image != null)
8: {
9: if (!image.LocalPath.HasValue())
10: {
11: SaveLocalImageFor(image);
12: }
13: else if (!File.Exists(TranslateToLocalPath(image.LocalPath)))
14: {
15: image.ImageBitmap.SaveJPG100(TranslateToLocalPath(image.LocalPath));
16: }
17: return image.LocalPath;
18: }
19:
20: return GetDefaultLogoUrl();
21: }
22:
23: private void SaveLocalImageFor(PoolImage image)
24: {
25: var guid = Guid.NewGuid().ToString();
26:
27: var imageName = "logo-{0}.jpg".FormatUsing(guid);
28:
29: image.LocalPath = "~/Content/Logos/{0}".FormatUsing(imageName);
30: image.ImageBitmap.SaveJPG100(TranslateToLocalPath(imageName));
31: }
This is in an image service class we have that handles our image manipulation. When a page renders, it calls the GetLogoPathFor() method. We have a way for a pool to have an external logo, so that's what line 3 is doing. After that, we have 3 possible states:
- The image hasn't been cached: This'll be the case right after a logo is uploaded. We write the file out, storing the path with the image, then return the path.
- The image is already on the file system: This'll be the case when a logo has already been cached to the file system. We just return the path.
- The image has a local path set, but the image doesn't exist on the file system: This'll be the case when the file was cached on server 1 and there's a subsequent request from server 2. In this case, we take the local path for the image, and write it out to the file system, then return the path.
Also notice that we use a Guid in the file path. This is for cache-busting purposes. If a pool admin uploads a new logo, it'll get a different file name when it's saved (since Guids don't repeat), and when the browser sees the new path, it will re-download the file instead of using the cached image.
The above solution handles both problems we talked about in our solution: Minimal hits to the database, and the browser caches the image without any special coding on our part.
The final part of this is cleanup. When a pool admin changes the logo, we have an orphaned file on the file system. This is fairly minor, but can be handled a few different ways:
- Do nothing at all. Disk space is cheap.
- Delete the image when the logo is changed. This can be done, but could be tougher in a server farm because you have to delete files from multiple servers based on a request from one server. This could be mitigated by using file system replication for the folder where dynamic images are stored.
- Run a cron job that cleans up images. Look at all of the valid paths in the database, and delete any image that doesn't match a valid path.
- delete all of the images periodically. The code will recreate the images for you, so deleting them all won't cause problems. The downside is you get a database hit again. The upside is that you only cache images that are being used. If we had a pool that hadn't been accessed in 3 years, the image wouldn't be on our file system any more.
We put this in place during the recent Aerosmith Song Madness Challenge, and we could see a noticeable difference. We were hitting what appeared to be a maximum number of concurrent users based on bandwidth limitations. Just implementing the above change, we noticed about a 15% increase in traffic. We didn't really notice a CPU difference because we were being limited by bandwidth at the time, but since we're not dynamically writing an image out every request, it's pretty simple to conclude that CPU would be better as well.
Categories: Develomatic, Development, C#
Running Migrations At Application Startup
posted on 04/10/12 at 06:57:19 pm by Joel Ross
Over the last year, I've been doing a lot of work on Pay It Square and Tourneytopia lately. We're building new features, iterating on existing features, and fixing bugs at a fairly rapid pace. As a result, we've been deploying new code quite a bit.
Changing code is easy - just upload new binaries and we're all set. But what happens when we update the database? We're a small team, so our first attempt was rather manual: email the team telling them what they needed to update in their database. Actually, because of the pain of updating databases, we used a central, shared development database (which caused issues of its own).
Eventually, we grew up (a bit), and added a SQL file called nextDeploy.sql where we would script out our changes. This file got checked in, and you'd run it whenever you got latest. We tried to keep our scripts idempotent, so running it over and over wasn't a problem.
Then, during deployment, we'd run the script against the production database, and move the scripts in the file to archive.sql, and start all over. This worked better, but there was still a manual process during deployments of running the sql and moving files around. Oh, and working in a branch? Yeah, that's a problem too.
After a bit of pain doing it this way, we eventually decided we needed a better solution. Enter Migrator.NET. Now we write our migrations in code, and can run them against the database to ensure it's up to date. This solves a couple of issues for us. First, we no longer have to use a shared database because keeping our local database up to date is as simple running the migrations against it. We also don't have to maintain SQL files and know what's been ran against which environment.
But just being able to run the migrations on demand wasn't quite good enough. It would still require a deployer to log in and run the migrations after the code was updated on the server. So we took it one step further, and made the migrations run when the app starts up.
It took a little digging to figure out how the command line that Migrator.NET uses to run the migrations, but I eventually figured it out, and extracted it out into a function:
Running this code will migrate a Sql Server database to the latest version. This relies on the migrations being in the same assembly as this method, which for us is exactly what we did. Then you just call this method during application start up, and your database is guaranteed to be up to date after the application starts up.
There are definitely downsides to this, and some things to be aware of. First, your migrations have to work. This seems obvious, but it's important. If the migration fails, the application won't start up right and your database will be out of sync with the application. This means that if you're doing as simple as dropping an index, you better be sure that the index names are the same in your dev database as they are in the production database. This is easy to ensure if you start using migrations from day 1, but when starting with an existing database (like we did), you have to be a little bit more careful when writing them.
Second, the migrations should be pretty quick to run. If a migration takes 5 minutes to run, your users will be sitting at the site waiting for the app to come up for a while. Your scripts could also timeout. In cases like this, we usually take the app down with a friendly message, migrate the database manually, and then bring the app back up. It's not a very elegant solution, but for the most part, our migrations are quick - add a column here, rename one there, etc. We try to deploy often, so there's not normally a lot of changes for each deployment, so we rarely run into this issue - which is why we haven't optimized it much more than that.
While I'm sure there are more downsides, we haven't run into anything serious so far, and it's worked out great for us. Having said that, I'd love to hear from you what you use to manage your database updates.
Categories: Develomatic, Development, C#
Pay It Square Update
posted on 03/22/11 at 06:54:37 pm by Joel Ross
 A few months ago, I was gung ho about getting an Android app out for use with Pay It Square. And I was pretty close. But priorities change and opportunities come up that just can't be passed up.
tl;dr version: Pay It Square has merged with Open Systems Technologies.
The slightly longer version: Back in October, PayPal hosted their Innovate Developer Conference, and we decided it was the right time to make the trip to start building some relationships with PayPal. That did happen, but there were two things that took place at the conference that (in my opinion) changed the trajectory of Pay It Square:
- We won an X award in the Request/Send Money category.
- PayPal announced the launch of their own App Store.
After Innovate, we focused on the opportunity that the app store presented. As part of that, we made major architectural changes to the site, including what essentially turned out to be a rewrite of the site. We moved from web forms and the Kinetic Framework to ASP.NET MVC 3 and NHibernate. We launched the revamped site back in January, and started working on what our app would look like through PayPal. As part of that, we used the same infrastructure and built an app that can be used fully through Facebook. We launched that last week.
We also built a rest-based API for Pay It Square that gives you access to just about everything an organizer can do through the website. We launched that back in January, although we haven't actively promoted it yet. Having it has allowed us to do a couple of things. First, we farmed out the development of an Android and iPhone application (which is why my Android series sputtered - I stopped doing the main development on it). With the API, they can use a well-known interface to interact with Pay It Square, providing a way for organizers to completely manage their Collect Pages on the go. Secondly, the first official use of the API occurred last week, when we had a pool use Tourneytopia to run a charity tournament. Tourneytopia offers integration with Pay It Square, and it uses the API to do it's work. The charity so far has raised over $2,500.
While all of this technical work was going on, we were also talking to Open Systems Technologies (OST) about a partnership between our two companies, which culminated in Pay It Square merging with OST a couple of weeks ago. We're even briefly mentioned in the OST Company video (look for the site around the 55 second mark).
Brian and I founded Pay It Square a few years ago, and our intent was to build a useful utility and see where it went from there. We were convinced there was a market for this type of service, and the entrance of WePay into the market, and it's subsequent fund raising reinforced our beliefs. But there were skills that we just don't possess that we needed to make Pay It Square successful, and the partnership with OST provides us with access to those, as well as giving us access to more development time to build out a few features we feel are key to rounding out our offering.
We're excited to see what the future holds for us, and looking forward to being able to realize the vision we've had for Pay It Square. It's definitely been an adventure, and it's not over yet!
Categories: Pay It Square
Android Development, Part 5a: Starting Activities
posted on 10/12/10 at 08:03:00 pm by Joel Ross
This is Part 5a of an ongoing series. The rest of the series is always viewable and up to date at http://www.rosscode.com/android. If you're just checking in, the archives are worth a look.
I took a week off, but I'm back with more details on user interfaces. Again, I'm not a designer, nor will I ever claim to be, but I have had a bit of experience with getting a few screens running in the application I'm writing for Pay It Square.
I'm going to cover a technique I use to start new actions. So far, I haven't touched on starting actions, but that's a key piece to building a useful application. Most of the examples I've seen show activities starting right in the code from another activity. I don't particularly care for that, as that's giving too much knowledge about the flow of an application to the views. I'd prefer to handle starting new activities through either something under my presenters (like a workflow, for example), or from my presenters.
But that's difficult to do because starting activities requires a reference to the context. And under normal circumstances, your context is attached to your activity. I sought to split those two things. What I came up with works in some cases, but not all. It's great for fire and forget activities, but doesn't work when you need to get a result back from an activity. For me, that solved most of my screen switching needs. If I run across a situation that it doesn't solve, then I'll deal with that then.
So, what does this look like? Well, here's my interface:
1: public interface IActivityStarter {
2: void setClassName(String packageName, String className);
3: void putExtra(String name, Serializable value);
4: void startActivity();
5: }
I'm not doing anything too complicated when it comes to starting another activity - a user takes an action on a screen, and that takes them to another screen. I am not calling out to any of Android's system activities either, so my interface is pretty simple. I allow for extra information to be attached to the intent, the class for the intent to target, and a way to actually start the activity.
Let's back up a step. Android uses an Intent to start new activities. Depending on how you specify your intent, the request can either be handled by the OS, or it can be handled by a specific activity in your application. Your application's activities are defined in the AndroidManifest.xml file for your application. Whether you realize it or not, an activity is set up for you when you create a new application. It looks like similar to this:
1: <activity android:name=".Activities.main" android:label="@string/app_name">
2: <intent-filter>
3: <action android:name="android.intent.action.MAIN" />
4: <category android:name="android.intent.category.LAUNCHER" />
5: </intent-filter>
6: </activity>
When the application launches, Android filters the available activities, looking for one with an action of MAIN and a category of LAUNCHER, and when it finds it, it uses that to start the application.
For this post, we'll be looking at how a user can go from the main screen to the settings screen. Our settings activity is defined in our manifest as follows:
1: <activity android:name=".Activities.settings" android:label="@string/app_name">
2: <intent-filter>
3: <action android:name="com.Develomatic.PayItSquare.Activities.SETTINGS" />
4: </intent-filter>
5: </activity>
I've defined my action to be the same as my namespace, since I plan to call this action explicitly from my main activity. If I had a button on my main screen that took you to the settings, without using my ActivityStarter, it would look like this (this code would be inside a click listener for the button in my activity, for example):
1: Intent intent = new Intent();
2: intent.setClassName("com.Develomatic.PayItSquare", "com.Develomatic.PayItSquare.Activities.settings");
3: startActivity(intent);
Pretty straightforward and works, but it presents a major problem: It can't be tested - for two reasons. First, I'm only doing testing on my business layer right now, and this is in my UI layer. Second, it actually starts an activity - something that will be difficult to verify in an automated fashion.
By introducing an abstraction, I can then verify that the presenter intends to start an activity using a mock, but not actually start the activity. Now, instead of having my activity start a new activity directly, it now signals to the presenter that a button was clicked, and the presenter handles starting a new activity, like so:
1: private final IActivityStarter activityStarter;
2:
3: @Inject
4: public MainPresenter(IActivityStarter activityStarter) {
5: this.activityStarter = activityStarter;
6: }
7:
8: public void SettingsClicked() {
9: activityStarter.setClassName("com.Develomatic.PayItSquare",
10: "com.Develomatic.PayItSquare.Activities.settings");
11: activityStarter.startActivity();
12: }
I've included the constructor so you can see that the IActivityStarter is injected in through it. I haven't shown it yet, but one other piece of functionality I've allowed is attaching custom data to the intent through the putExtra() method. This allows me to attach any Serializable class to the intent, and allow the activity handling the intent to have access to the data. From the web world, this is roughly the equivalent of clicking a row in a grid and including parameters on the querystring to an edit screen. Implementing Serializable on your objects is pretty simple, and Eclipse handles it nicely for you if you ask nicely (Ctrl-1 is your friend!).
Now that we're working against an interface, verifying that the intended action was taken can now be done easily:
1: @Mock private IActivityStarter activityStarter;
2:
3: @BeforeSpecification
4: public void before() {
5: SUT = new MainPresenter(activityStarter);
6: }
7:
8: @Specification
9: public void shouldStartANewActivityForSettings() {
10: expect.that(new Expectations() {
11: {
12: one(activityStarter).startActivity();
13: allowing(activityStarter);
14: }
15: });
16:
17: SUT.SettingsClicked();
18: }
Now for the hard part: the actual implementation of our activity starter:
1: public class ActivityStarter implements IActivityStarter {
2: @Inject protected static Provider<Context> contextProvider;
3: private Intent intent;
4:
5: private Intent getIntent() {
6: if(intent == null) {
7: intent = new Intent();
8: }
9: return intent;
10: }
11:
12: @Override
13: public void putExtra(String name, Serializable value) {
14: getIntent().putExtra(name, value);
15: }
16:
17: @Override
18: public void setClassName(String packageName, String className) {
19: getIntent().setClassName(packageName, className);
20: }
21:
22: @Override
23: public void startActivity() {
24: contextProvider.get().startActivity(getIntent());
25: }
26: }
This class resides in our UI project, as it deals directly with Android classes, but it isn't tied to a particular activity, so it's relatively isolated from the rest of our code. The key piece here is the static context provider injected into this. We covered this in part 3 when we talked about requestStaticInjection() with Roboguice. With a reference to the context provider, we're able to get at the current context on demand, which means we can start new activities in a clean way.
I'd planned to cover a couple of other techniques I'm using, but this went longer than expected, so I think I'll stick with just this one for now, and cover the other techniques in part 5b.
Categories: Android
Android Development, Part 1a: From Nothing To Running
posted on 09/28/10 at 06:43:11 pm by Joel Ross
This is part 1a in an ongoing series about my experiences developing an Android app to use with Pay It Square. If you're just joining us, first, thanks! And second, here's where we've been so far:
- Part 0: Introduction
- Part 1: Project Structure and Tools
- Part 2: Presenters and Activities
- Part 3: Roboguice
- Part 4: UI Basics
I've also added an easy to remember index page at http://www.rosscode.com/android that I'll keep current as I post more parts.
Wait, what? Part 1a? Yes, I'm going backwards, but I got a few questions on how my projects are actually set up - from a tactical standpoint. So I'm going to go back and revisit project setup in more detail. More specifically, we'll go from nothing to our first test with Instinct, and then move on to getting our activity all wired up and running the application.
I'll be using Eclipse, and I'll assume we've already run through one of the many tutorials out there for getting it installed and working with the Android SDK. To start with, we'll create a new Android Project:
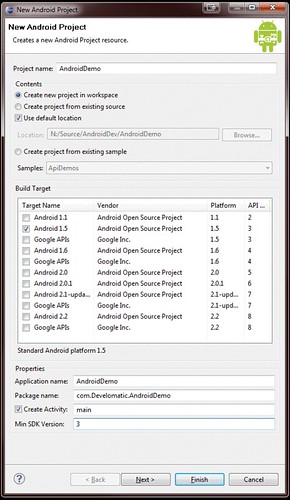
I've targeted Android 1.5 and a minimum SDK version of 3, just because I don't have any need for anything offered by the newer SDKs, and I don't really want to limit the devices the software can work on. Also note that I am not asking the project creation wizard to create a test project. I'll do that myself later.
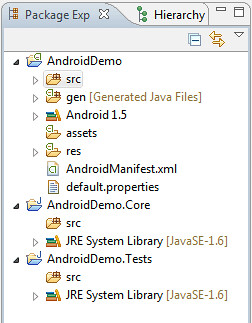
Next, we'll add two new projects: one for our core library, and one for our tests. I accept the standard settings for the projects, and named one <ProjectName>.Core and the other <ProjectName>.Tests. When all is said and done, I end up with a project that looks like this:
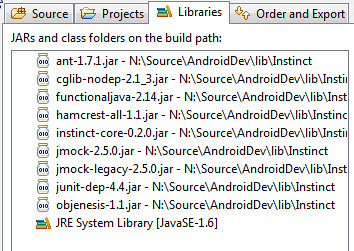
Next, we need to add our references to our libraries. To just get unit tests working, all we have to add is a reference to Instinct. I like to add a folder at the same level as my projects called lib, and put the libraries under that. Then I can add references by right clicking on the project, selecting properties, and going to Java Build Path.
When you add a reference to Instinct, you're not just adding Instinct. Remember, Instinct sits on top of jMock, so you'll need to add references to much more than just Instinct. Here's my reference list:
Now, we need to add a test. Let's assume we have an application with a database that stores a user. On our main screen, we want to show a message: "Welcome Back, <Name>". We'll test a presenter, and ensure that it sets the text on the view to the user name retrieved from the user repository.
Let's create our test class. I prefer to call my test classes specs, so I'll create a class called MainPresenterSpecs, since my activity is called "main". Here's the full code, minus import statements:
1: @RunWith(InstinctRunner.class)
2: public class MainPresenterSpecs {
3: @Subject private MainPresenter SUT;
4: @Mock private IMainActivity activity;
5: @Mock private IUserRepository userRepository;
6:
7: @BeforeSpecification
8: public void before() {
9: SUT = new MainPresenter(userRepository);
10: }
11:
12: @Specification
13: public void it_should_load_user_name_on_load_of_activity() {
14: final User user = new User();
15: user.setName("Joel Ross");
16:
17: expect.that(new Expectations() {
18: {
19: one(userRepository).get(); will(returnValue(user));
20: one(activity).setUserNameTo("Joel Ross");
21: }
22: });
23:
24: SUT.InitializeWith(activity);
25: }
26: }
If you take this code and put it in your solution, you'll notice a few things. Mainly, it won't compile. I wrote the spec for what I want to have happen when the first screen loads. But now I need to go at least create the classes and interfaces referenced here. These will all be in our Core project.
First up: User. Pretty straightforward data class:
1: public class User {
2: private String name;
3: public void setName(String value) {
4: name = value;
5: }
6: public String getName() {
7: return name;
8: }
9: }
Next, the two interfaces, IMainActivity and IUserRepository. If you're not familiar with Eclipse, now would be a good time to note that if you place your cursor over either of the interface names and press Ctrl-1, you'll get options to fix the issue with the code. In this case, one of the options will be to create an interface. You can then specify which project you want the code in. In this case, I created them in the Core project:
1: public interface IUserRepository {
2: User get();
3: }
4:
5: public interface IMainActivity {
6: void setUserNameTo(String name);
7: }
Now, we just have the presenter to implement. It's a simple implementation, so let's just implement it now:
1: public class MainPresenter {
2: private IUserRepository userRepository;
3:
4: public MainPresenter(IUserRepository userRepository) {
5: this.userRepository = userRepository;
6: }
7:
8: public void InitializeWith(IMainActivity activity) {
9: User user = userRepository.get();
10: activity.setUserNameTo(user.getName());
11: }
12: }
We're all set to run our test now, right? Well not quite. We didn't add a reference to our Core project from our tests, so let's do that now. Back under the "Java Build Path" settings, we can go to the Projects tab, and add our Core library. After doing that, our code is now error free.
To run our tests, we can right click on the test project, select "Run As" -> JUnit Test. The first time you do this, you'll be presented with a dialog asking you how you want to run the test. Check "Use configuration specific settings" and then select "Eclipse JUnit Launcher". After doing so, click OK, and you'll be presented with the best sight a TDD developer can see:
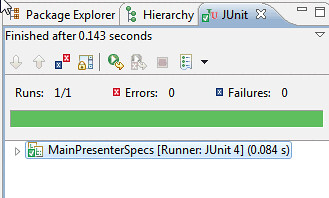
OK, so we have a passing test. Now we need to get the activity working and have it show in our application. This involves getting Roboguice wired up, so we'll add a reference to that from our Android project. Then, as I detailed in Part 3, we need to add an Application class, a module, and a setting in our manifest file. We also need to add a reference to our Core project from our Android project. Once we do that, we can implement our activity. I added a TextView to my main layout xml file, set up the activity to be roboguice-ready, and here's what I came up with:
1: public class main extends GuiceActivity implements IMainActivity {
2: @Inject private MainPresenter presenter;
3: @InjectView(R.id.welcomeMessage) TextView welcomeMessage;
4: @Override
5: public void onCreate(Bundle savedInstanceState) {
6: super.onCreate(savedInstanceState);
7: setContentView(R.layout.main);
8: presenter.InitializeWith(this);
9: }
10:
11: public void setUserNameTo(String name){
12: welcomeMessage.setText("Welcome Back, " + name);
13: }
14: }
Now that everything is coded, all that's left is to implement IUserRepository. I just created a fake one that returns a dummy user for my purposes, and bound it in my module. Now, I'm ready to run the project. I can right click on the Android project and select "Run As" -> "Android Application". This will fire up the emulator, and after a few minutes, our application will start up, and display our message. Right?
Well, not quite. First, we need to add a reference to Roboguice to the core library, and add an @Inject annotation to the constructor in our MainPresenter. Then, when we fire up the app again, we'll see this:
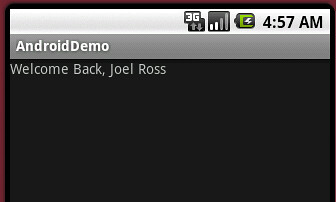
Just as we set out to do! We've gone from nothing to a running and tested application in a very short time.
For those who want to get their hands on the resulting code, I've created a git repository to hold it:
This is my first time posting and sharing code via git and GitHub, so if it doesn't work correctly, let me know. I didn't commit the .metadata folder, so you will need to import the projects into Eclipse after cloning from git. Also, Eclipse probably won't know where your Android SDK is located. Just set the location of the SDK in the Project?s Properties and you should be all set.
Next time, we'll get back on track and dive deeper into activities.
Categories: Android
Reading More
posted on 09/23/10 at 06:48:23 pm by Joel Ross
When our oldest daughter started first grade, one of her biggest adjustments was actually going to sleep at a reasonable time. She's apparently a lot like me in her night owliness (that's a word, right?), and would be up until 10 or 11 at night, while needing to be up at 7:00 AM the next morning.
That just wasn't sustainable, and someone gave us some advice: An hour before she should be going to sleep, have her play in her room for the first 30 minutes. After that, turn off all the lights except for a small lamp at her bedside and have her read for the last 30 minutes. It's been about two years since we started doing that, and it's been amazing to see how well it continues to works for her. She used to pop back out of her room 30 minutes after "going to sleep" just about every night. Within a week of using the new process, that stopped completely.
I'm sure you're thinking, "Um, Joel, this isn't a parenting blog now, is it, because that's not what I signed up for!" No, I'm not turning this into a parenting blog (but that tip above is golden!). No, I bring this up because I've started to use this technique for me.
Well, not the playing in my bedroom part.
No, I'm talking about the reading part. I started to notice that I'd go to bed a bit too wound up, and end up laying in bed with ideas running through my head for a good 20 minutes before I'd finally drift off. Now, I didn't come out of my room complaining I couldn't sleep, but the symptoms definitely sounded familiar. So, I decided to give it a try. I changed my routine to shut down what I'm doing around 12:30 and read for 30 minutes. I forced myself to do it for the first few times, but once it became a habit, I started looking forward to it. I've been doing this since Memorial Day, and I've read more this summer than I have in the previous two years combined.
I've got a routine down: I grab a spot on the couch, and four or five nights a week, I'll read a book, usually on my Kindle. I rotate back and forth between technical books and fiction books. So far this summer, I've read 5 technical books and 6 fiction books, which is pretty good for me, since I'm a slow reader, although now that I'm reading regularly, my speed has increased quite a bit. I've also stopped reading articles when I find them. I used to read it right then, but now, I'll send the page to Instapaper, and the nights I don't read a book, I'll read through that queue on my phone (using InstaFetch). I'm reading more articles than I have in the past now as well.
The best part? At the end of the half hour, I'm completely relaxed and my mind is cleared. I head up to bed and am asleep within 5 minutes.
The worst part? A few times I've woken up at 3:00 AM lying on the couch with the Kindle on my chest.
Categories: Personal
Android Development, Part 4: UI Basics
posted on 09/21/10 at 07:32:37 pm by Joel Ross
Let's preface this by stating up front that I've never been very good with UI design. Switching platforms hasn't really changed that, so while I'll touch on how I'm creating my user interfaces in Android, certainly don't copy my screens. A blind monkey could probably do better!
I'm getting ahead of myself though. This is part 4 in an ongoing series about my experiences developing an Android app to use with Pay It Square. If you're just joining us, first, thanks! and second, here's where we've been so far:
- Part 0: Introduction
- Part 1: Project Structure and Tools
- Part 2: Presenters and Activities
- Part 3: Roboguice
Let's start with the basics. You have two choices when laying out an activity. You can either dynamically add controls to the activity through code, or you can design your layout in an XML file. So far, I've stuck with the XML file approach, except in one case - a tab-based page. But even in that case, I have a base layout in XML, and each individual tab has its own XML layout as well.
In my limited experiences, there's three main ViewGroups to start your activities with. Each will have child Views or ViewGroups, but the type of ViewGroup you choose will determine how it actually looks.
- LinearLayout: This organizes child elements into either a horizontal or vertical row.
- RelativeLayout: This is the ViewGroup I've found to be the most flexible, but also the hardest to work with. More on that later.
- TableLayout: From a web developer's perspective, this is very similar to HTML tables.
Remember that each of the above ViewGroups can have child ViewGroups, so your layout options are pretty flexible. There are other types of ViewGroups you can use as well, such as a ListView and TabHost. There's more, but I'll stick to the ones I've had experience with so far.
Inside each ViewGroup, you'll have Views. These are things such as text boxes, labels, drop downs, etc. Basic UI elements. How they're displayed is determined by both the ViewGroup they are in and the properties on the View.
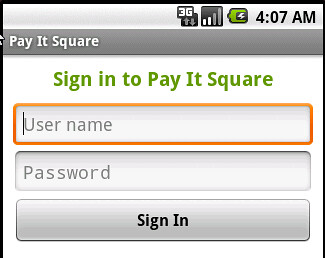
Let's look at an example of the layout of the activity I went over in part 2 (setting the user name and password to log into Pay It Square). First, I created an XML file under res/layout called settings.xml. I'm using a RelativeLayout, as I think that provides the most flexibility, although in this case, it's probably not necessary. Here's the layout in its entirety.
1: <?xml version="1.0" encoding="utf-8"?>
2: <RelativeLayout
3: xmlns:android="http://schemas.android.com/apk/res/android"
4: android:layout_width="fill_parent"
5: android:layout_height="fill_parent">
6: <TextView
7: android:id="@+id/signIn"
8: android:text="@string/signInHeader"
9: android:layout_width="fill_parent"
10: android:layout_height="wrap_content"
11: android:gravity="center"
12: android:textSize="20px"
13: android:padding="10px"
14: android:textStyle="bold"
15: android:textColor="#669900" />
16: <EditText
17: android:id="@+id/userName"
18: android:layout_width="fill_parent"
19: android:layout_height="wrap_content"
20: android:hint="@string/userNameHint"
21: android:layout_below="@+id/signIn"
22: android:layout_marginLeft="10px"
23: android:layout_marginRight="10px"
24: android:imeOptions="actionNext" />
25: <EditText
26: android:id="@+id/password"
27: android:layout_width="fill_parent"
28: android:password="true"
29: android:layout_height="wrap_content"
30: android:layout_below="@+id/userName"
31: android:hint="@string/passwordHint"
32: android:layout_marginLeft="10px"
33: android:layout_marginRight="10px"
34: android:imeOptions="actionDone" />
35: <Button
36: android:text="@string/signIn"
37: android:id="@+id/save"
38: android:layout_width="fill_parent"
39: android:layout_height="wrap_content"
40: android:layout_below="@+id/password"
41: android:textSize="16px"
42: android:layout_marginLeft="10px"
43: android:layout_marginRight="10px"
44: android:textStyle="bold" />
45: </RelativeLayout>
I have a RelativeLayout that is set to fill everything it can. In this case, it fills the screen, but it could also be included as an activity inside a tab. In that case, it'd fill up the whole tab. Inside the ViewGroup, I have four Views - a label describing what the screen is for, two textboxes for entering a user name and password, and finally, a button, which checks your credentials.
Tying the XML to an activity is pretty simple. In the override for the onCreate() method of the activity, you reference the generated R class and load it that way:
1: @Override
2: public void onCreate(Bundle savedInstanceState) {
3: super.onCreate(savedInstanceState);
4: setContentView(R.layout.settings);
5: presenter.InitializeWith(this);
6: }
Here's what it looks like when rendered:
The XML itself is pretty straightforward. You can set the color of text (android:textColor), size (android:textSize), alignment (android:gravity), padding (android:padding) and margin (android:layout_margin), etc.
Since I'm using a RelativeLayout, I need to specify where my elements are relative to other items. In this case, I've only used android:layout_below, but there are also options for putting elements next to other elements, as well as how they should be aligned in relation to other elements.
One attribute you can provide on Views is android:imeOptions. These aren't explicitly needed, but they provide for a better user experience. In the layout above, I have android:imeOptions="actionNext" on my user name EditView. This means that when the virtual keyboard is shown while your cursor is in the user name field, the keyboard will show a "Next" button instead of the default return. Touching that button moves the cursor to the Password field, where the IME option is set to Done. The keyboard will now show Done, and touching that will hide the keyboard. There are other IME actions available, but the two I've used served my needs just fine.
There are a lot more thorough tutorials on UI layout than what I could provide, including a great series on Tekpub by Donn Felker, but there are a few tips I'd like to highlight. For me, while they were small things, they really helped make layouts less painful and more user friendly.
- Use margins and padding. It sounds so simple, but it really enhances the look when text or text boxes aren't butting right up against the edge of the screen or another control.
- Order matters. I'm talking specifically about the RelativeLayout here. I used DroidDraw to lay out a relative screen, specifying exactly where all my elements should be in relation to each other, and then generated the XML file. When I pulled it into my application, controls were rendering on top of each other, and what was really odd was that switching from one tab to another and then back again caused the layout to slowly fix itself. By the third or fourth switch, the layout looked great. What I eventually came to realize was that DroidDraw seemingly dropped controls into the XML in a random order. I had controls at the top of the XML file that specified its layout relative to a control lower in the file. As a result, when it came time to render (at least the first time), the control it was supposed to be positioned next to hadn't been rendered. Just changing the order of elements fixed the view.
- Lose the labels. I'm a web developer through and through. I'm trained to layout my screens in table format with a label on the left, and a textbox on the right. But this isn't the web, and space is limited. Make use of android:hint to add watermarks on your text input, and stretch those textboxes out as wide as you can. This also helps with the ordering and relative layouts, because for most screens, the layout is much simpler once you drop all the unnecessary labels.
- Use the imeOptions and inputType. I touched on this already, but it's worth repeating. It's annoying to be required to enter an email address in an application and not have the "@" on the primary keyboard screen. It's equally annoying to have the keyboard have a return key instead of a "Next" key when there's more textboxes to fill out. It's such a simple thing to implement, yet makes the application so much easier to use.
I do plan to go a little more in-depth on some of the more complicated activities I'm using, like lists and tabs. But first, I've been getting a few questions about how I configured Eclipse and my projects to get it all working, so next time, we'll take a step back and look at that.
Categories: Android
Android Development, Part 3: Wiring Up Roboguice
posted on 09/14/10 at 08:46:15 pm by Joel Ross
This is part 3 in an ongoing series documenting my adventures building my first Android application. If you're here for the first time, you might want to check out the previous posts for background.
I'm a huge believer in the benefits of inversion of control, both in aiding in testing the code and in how it lets you separate concerns. The hard part of IoC is wiring it all up. I've been using Ninject to handle that for me in the .NET world, and when I moved to Android, I looked for something similar. Luckily, the solution was a pretty easy decision. Since Guice is what Ninject was based on, Roboguice was a natural choice. Getting it set up is actually pretty simple, but worth taking a step back and look at how to set it up.
After you've downloaded it, you need to add a reference to both roboguice-1.0.jar and guice-2.0-no_aop.jar. Roboguice works on top of Guice, so we need them both. After doing that, you create a new class that inherits from GuiceApplication. This is where the inject process takes place. If you're familiar with Ninject, the fact that Roboguice uses modules will be familiar. You can add multiple modules, and this allows you to segregate your bindings or only load certain bindings under certain conditions. For now, we'll be simple and just load one module.
1: public class Application extends GuiceApplication {
2: @Override
3: protected void addApplicationModules(List<Module> modules) {
4: modules.add(new IoCModule());
5: }
6: }
And the module looks like this:
1: public class IoCModule extends AbstractAndroidModule {
2: @Override
3: protected void configure() {
4: requestStaticInjection(DataHelper.class);
5: bind(IDataHelper.class).to(DataHelper.class);
6: bind(IPreferenceRepository.class).to(PreferenceRepository.class);
7: }
8: }
I haven't talked about the actual classes bound in the module, but the classes don't really matter. They just show how you bind an interface to a implementation. Pretty straightforward, and very similar to how Ninject does it. The method requestStaticInjection() will inject static properties on a class. In the case for the DataHelper class, I'm injecting a context provider. I'll cover that in a bit, as that's a pretty nice Roboguice feature.
The last piece to getting this all working is a small addition to the AndroidManifest.xml file. There's an application element, and it needs to have an attribute added called android:name, and should be set equal to the Application class we created above (fully qualified). Thus, you end up with this:
1: <manifest xmlns:android="http://schemas.android.com/apk/res/android"
2: package="com.Develomatic.PayItSquare"
3: android:versionCode="1"
4: android:versionName="1.0">
5: <application
6: android:icon="@drawable/icon"
7: android:label="@string/app_name"
8: android:name="com.Develomatic.PayItSquare.Application" >
9: ...
10: </application>
11: </manifest>
One thing you may have noticed is that my presenters aren't in the module. That's because I'm not using any interfaces for my presenters, and am using the @Inject annotation in my Activities. That signals to Roboguice that it needs to inject that presenter, and it looks for a constructor on my presenters with the @Inject annotation. It's essentially self-binding.
For the injection to work, your activities have to inherit from a Roboguice-specific activity. It provides a base class for most of the *Activity classes provided by Android, so if you need a list activity, you inherit from GuiceListActivity, for a tab activity, you inherit from GuiceTabActivity, etc.
Note that I'm specifically referring to Roboguice 1.0. While putting this together, I checked Roboguice's source, and noticed that trunk uses Robo*Activity naming instead of Guice*Activity naming. I'm assuming the functionality is roughly the same, but you'd have to try it for yourself to be sure.
There are some nice features build specifically for Android in Roboguice. One I showed in part 2, and that is View injection - being able to declare a field like @InjectView(R.id.user_name) TextView userName; and avoid the whole call to findViewById and casting it is nice. But once you get to using Android for a while, you'll realize an old phrase suddenly has new meaning: "Context is king." In this case, I'm referring to Android's context. There's methods on activities to get at the current context, but passing that around is painful. Trust me on this one; I tried before I realized how Roboguice helped me here. I ended up with an unmaintainable mess. But with Roboguice, it's pretty simple. I haven't yet talked about how I'm doing database access, but again, it's not entirely important to the discussion. Just know that to open a database, I'm using the SQLiteOpenHelper, and it's constructor takes in the current context. Well, I wanted this class to be injected into my repository classes, and I want it to all happen "automagically" through Roboguice. If I was doing this by hand, I'd need to pass the activity's context from the activity to the presenter, from the presenter to the repository, and finally from the repository down to the data helper. Like I said, that's messy. My presenter and repository have no need to know about the context, other than to pass it on, so why go through the hassle? Luckily, Roboguice provides an alternative. I have a static field on my DataHelper class that provides me with a context provider. Then I have the DataHelper constructor use that provider to call it's parent constructor:
1: public class DataHelper extends SQLiteOpenHelper implements IDataHelper {
2: @Inject protected static Provider<Context> contextProvider;
3:
4: public DataHelper() {
5: super(contextProvider.get(), "PayItSquare", null, 1);
6: }
7: }
Now I can remove any knowledge of the context from my presenter and repository, and most likely, from my activity. It's figured out on the fly when a DataHelper is needed, all by a context provider built into Roboguice. And remember, the call to requestStaticInjection(DataHelper.class); is what sets that contextProvider field.
I definitely still feel like I'm new to Roboguice, and I'm sure there's functionality that I'm missing out. For example, I'd like to find a way to have my presenter and activity tied together automatically, but haven't figured out how to specify constructor parameters when requesting an instance. But even the little bit I've figured out has been a huge help when building my application. I don't think I'd build an app without it (or at least something similar).
Next up: I think it's time to talk about layouts.
Categories: Android
Android Development: Part 2: Presenters and Activities
posted on 09/08/10 at 04:18:22 am by Joel Ross
This is part 2 of an on-going series on Android development (or at least my warped interpretation of it). If you missed the introduction of the application or a discussion of the tools, you might want to check those out first.
I mentioned earlier that I'm using an MVP pattern, but didn't go into much more detail than that. Well, that's about to change, as that's exactly what this post is all about.
In the Android world, Activities are the equivalent of views in MVP. The way Android works is that Intents are responsible for activating activities. If you're not familiar with Android development, that probably didn't make a lot of sense, but the bottom line is that Android is view-first rather than presenter-first. This has some implications in how the presenter and activity interact, so it's important to note that.
I've picked a pretty simple screen in my application to demonstrate how my activities and presenters work together. It's a screen where you set your user name and password to be used to connect to Pay It Square. Note that, for now, I?ll ignore how the data is actually stored and retrieved, and just leave that logic hidden behind an interface.
While Android starts with the activity, I like to start with my tests. I am not testing my Activities right now, since I plan to keep them relatively thin. The presenter will essentially be responsible for two things: populating the activity with the existing settings, and saving those settings back to the data store when the activity says it's time. So let's write a couple of specs to indicate that.
As I said in part 1, I'm using Instinct as my testing framework, so that?s what I'm going to show. The basic test spec looks like this:
1: @RunWith(InstinctRunner.class)
2: public class SettingsPresenterSpecs {
3: @Subject private SettingsPresenter SUT;
4:
5: @BeforeSpecification
6: public void before() {
7: SUT = new SettingsPresenter(preferenceRepository);
8: }
9:
10: @Specification
11: void shouldSetUserAndPasswordOnView() {
12:
13: }
14: }
This doesn't do anything except ?new up? the presenter. I've defined a spec, but there's no expectations set up yet. I've also defined my presenter as the subject of the test, and marked it to run with the Instinct test runner. But essentially, this spec doesn't do anything. So let's fix that. I know I'll have a data store to hold the user's current username and password, as well as the activity. Both will be interfaces, and we'll talk about wiring that up in a bit. For now, we'll assume the presenter will be constructor injected. This changes things a bit, and I now need two mocks: one for IPreferenceRepository and one for ISettingsActivity.
Side note: I'm trying to get into the ?Java way? of naming things, but I'm still using "I" to prefix my interfaces. I'm showing my C# bias, but it is what it is.
Now, before we update the spec to reflect our changes, there's one thing that isn't quite right. I intend to use an IoC container to create my presenters, so the container will be responsible for instantiating any dependencies the presenter needs. But we said earlier that the Activity is where the process starts in an Android app, so our container won't be activating the activity for us. As a result, it can't be constructor injected. It will have to be passed in later. I've settled on a base presenter that handles that for me through a call to a method called InitializeWith(activity);. Updating our spec, we end up with this:
1: @RunWith(InstinctRunner.class)
2: public class SettingsPresenterSpecs {
3: @Subject private SettingsPresenter SUT;
4: @Mock private ISettingsActivity activity;
5: @Mock private IPreferenceRepository preferenceRepository;
6:
7: @BeforeSpecification
8: public void before() {
9: SUT = new SettingsPresenter(preferenceRepository);
10: }
11:
12: @Specification
13: void shouldSetUserNameAndPasswordOnView() {
14: SUT.InitializeWith(activity);
15: }
16: }
You can see how the repository is injected in the constructor, and since the presenter begins its interaction with the activity once InitializeWith is called, I've added that to the spec. Notice that Instinct provides simple ways to create mocks by adding @Mock onto the declaration.
The only thing missing is what we expect to happen. Instinct provides a way to set up expectations on my mocks, so that's what we'll use. First, the presenter should get the current user preferences and then it should set those on the activity. To do that, we update our spec to include those expectations:
1: @Specification
2: void shouldSetUserNameAndPasswordOnView() {
3: expect.that(new Expectations() {
4: {
5: one(preferenceRepository).get(); will(returnValue(new Preference("jross", "test1234");));
6: one(activity).setUserName("jross");
7: one(activity).setPassword("test1234");
8: }
9: });
10:
11: SUT.InitializeWith(activity);
12: }
We're stubbing the call to preferenceRepository.get() to return a preference, and then we're expecting it to be set on the view. Next, we need a spec to save the updated username and password. That's very similar:
1: @Specification
2: void shouldSaveUserNameAndPassword() {
3: expect.that(new Expectations() {
4: {
5: one(preferenceRepository).save("jross2", "test4321");
6: }
7: });
8:
9: SUT.Save("jross2", "test4321");
10: }
Now, let's move onto the presenter, and get these tests to pass. Like I said, I have a base class for my presenter. It doesn't do much, but it helps with the interaction with the activity:
1: public class BasePresenter<T extends IActivity> {
2: private T activity;
3:
4: protected T getActivity(){
5: return activity;
6: }
7:
8: protected BasePresenter() { }
9:
10: public void InitializeWith(T activity) {
11: this.activity = activity;
12: }
13: }
Nothing too fancy here, but it cleans up some repetitive code in my presenters. Here's my SettingsPresenter that satisfies those specs we created:
1: public class SettingsPresenter extends BasePresenter<ISettingsActivity> {
2: private IPreferenceRepository preferenceRepository;
3:
4: @Inject
5: public SettingsPresenter(IPreferenceRepository preferenceRepository) {
6: this.preferenceRepository = preferenceRepository;
7: }
8:
9: @Override
10: public void InitializeWith(ISettingsActivity activity) {
11: super.InitializeWith(activity);
12:
13: Preference preference = preferenceRepository.get();
14: getActivity().setUserName(preference.getUserName());
15: getActivity().setPassword(preference.getPassword());
16: }
17:
18: public void Save(String userName, String password) {
19: preferenceRepository.save(userName, password);
20: }
21: }
The implementation is pretty simple. About the only thing to note is the @Inject on the constructor. This is what signals Roboguice to use that constructor when an instance of the SettingsPresenter is requested.
This brings us to the activity. Remember, this is activated by Android when an Intent is fired that this activity matches. I'll talk about firing intents in a future part, but for now, it's enough to know that the activity will be created for us.
Whether you realized it or not, we defined an interface for our activity:
1: public interface ISettingsActivity extends IActivity {
2: void setUserName(String userName);
3: void setPassword(String password);
4: }
We also know that the activity will have a couple of text boxes and a button, and when the button is clicked, it should call Save() on our presenter. With that knowledge, we can implement our activity. To get injection working for Roboguice, our activities will extend GuiceActivity. And of course, we'll need to implement our ISettingsActivity interface.
Before we dive into the code, another nice thing that Roboguice provides for you is injection of screen elements. Normally, you would have a field to represent the screen element like this:
1: private TextView getUserName() {
2: (TextView) findViewById(R.id.user_name);
3: }
With Roboguice, this becomes:
1: @InjectView(R.id.user_name) protected TextView userName;
It's not a huge savings, but it looks much cleaner when viewing an activity with a lot of UI elements. Anyway, onto the activity.
1: public class settings extends GuiceActivity implements ISettingsActivity {
2: @Inject protected SettingsPresenter presenter;
3: @InjectView(R.id.save) protected Button saveButton;
4: @InjectView(R.id.user_name) protected TextView userName;
5: @InjectView(R.id.password) protected TextView password;
6:
7: @Override
8: public void onCreate(Bundle savedInstanceState) {
9: super.onCreate(savedInstanceState);
10: setContentView(R.layout.settings);
11: saveButton.setOnClickListener(saveClick);
12: presenter.InitializeWith(this);
13: }
14:
15: public void setUserName(String userName) {
16: this.userName.setText(userName);
17: }
18:
19: public void setPassword(String password) {
20: this.password.setText(password);
21: }
22:
23: private OnClickListener saveClick = new OnClickListener() {
24: @Override
25: public void onClick(View v) {
26: presenter.Save(userName.getText().toString();, password.getText().toString());
27: finish();
28: }
29: };
30: }
I have fields for the three elements: userName, password and the saveButton. I marked my presenter with @Inject so that it gets instantiated for me, and then I'm calling presenter.InitializeWith(this) in the onCreate method. I'm also wiring up the save button to call presenter.Save() when clicked.
At this point, we now have an activity that injects itself into the presenter, a presenter that handles setting up the activity, and then processes actions taken on the activity.
I've purposely left out a couple of things from this: how Roboguice is actually wired up and the different XML files that Android needs to layout the UI. I do plan to cover those in future parts, starting next time with more information about Roboguice.
Categories: Android